How To Decoupage : Decorating with Decoupage

Decorating with Decoupage
Ever daydreamed about how you would spice up your home décor if you were an artist? You could punch up your décor with crafty embellishments to give each room a touch of your own unique style.
Well, you don’t have to dream about it anymore. You don’t have to be able to draw or paint. You don’t even need to use stencils or templates. The only skills you really need to jazz up your home is everything you learned in kindergarten— theability to cut and paste.
The art of decoupage (French for “to cut”) dates back hundreds of years. The Victorians were especially fond of the hobby, though it fizzled out when handmade items were on the decline, making way for cheaper mass-manufactured items.
In recent years, decoupage has made a strong comeback. While the concept is relatively simple, the results look impressive.
Decoupage Work
Decoupage Supplies
Decoupage Supplies
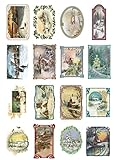
- The first thing any budding decoupagershould do is collect pretty pictures. When you see something you like in a magazine, catalogue, on the cover of a greeting card or wallpaper scraps, set them aside in a file box for future projects.
- You can use images printed with your ink-jet printer, however you can end up with smeared colors if you’re not careful because they’re water-based inks. To remedy this, you’ll need to take a couple of additional steps with an acrylic spray fixative.
- A good pair of fine craft scissors is a must. It will help you cut out pictures with finer details. If you want to make a sound investment for better cutting options, purchase a swivel-head craft knife from the scrapbooking section of the local craft and a self-healing cutting mat. These items combined will run you around $20, but the craft possibilities are endless.
- You will need a decoupage medium, such as Mod Podge or Elmer’s glue. Any PVA glue-based product will do as long as the label specifies that it dries clear.
- A brayer (small craft roller) or plastic wallpaper scraper comes in handy for smoothing out air bubbles and wrinkles in your decoupage. If you want to save money, an old plastic phone card or gift card can work in a pinch for smoothing.
- Some other supplies you will find useful to have on hand are pencils, rulers, sponge or brush applicators, white acrylic paint, sandpaper and polyurethane varnish to protect any decoupage work done in high traffic areas.
How to decoupage a light switchplate
Decoupage Paper
Prepping your Images for Decoupage
- You need to determine if your image is colorfast. Glossy magazines, most wall papers, shelf paper and such will usually be fine. Some types of paper, like wrapping paper or images printed with ink jet printers, can be runny if printed with water-based inks. To find out, put a drop of water on an inconspicuous spot on the paper to test it. If the color runs, you’ll need to fix it first.
- Spray your image with a clear acrylic fixative, available at craft stores. Follow the manufacturer’s directions on drying time. Once the image is sealed with the fixer, it will prevent the color from running.
- Cut out your image very carefully. You can always fix a little accidental slit, but matching up pieces that have been torn or accidentally cut off is more difficult. Hold the image in one hand and trim with a scissor around the edges.
Here’s a cutting tip: rotate the image, not the scissors, when you’re trying to cut around the edges.
Another option that works especially well for getting intricate details is the swivel blade on the cutting mat. Practice with it a few times and you may not reach for your scissors as often
Prepping your Object for Decoupage
- Sometimes, the item you want to decoupage will need a little bit of preparation. A light sanding with a fine-grit paper will help the decoupage medium adhere to the surface.
- If the object you’re decoupaging is a dark color, it might show through your paper image and make it look too dark as well. To remedy this, you can paint your object white.
- If you don’t want your item to be entirely white, there is a trick you can do. After trimming your decoupage image, place it on the surface exactly where you want it to go. Trace very lightly around the image, then remove the image. Paint inside the lines with a white acrylic primer. Be very careful not to go outside the lines, and keep some cotton swabs on hand to quickly wipe up any mistakes if you do.
- Once the primer dries and sets, you can decoupage right over it. The white patch will not be seen, but it will prevent dark colors from bleeding through the paper image.
- If you want to decoupage on a smooth surface, such as glass or metal, wipe the object clean with a cotton ball and rubbing alcohol. This will remove any residual oils from fingers or debris to help the decoupage adhere
Acrylic spray

The Process
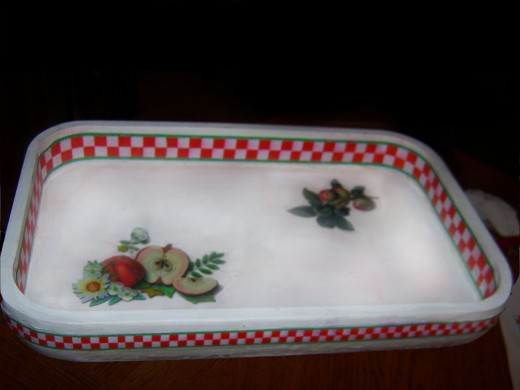
Let’s say you want to decoupage a simple wooden tray you found at a thrift shop.
- Find the images you want to put on it. You might want a formal look with beautiful floral prints. If your kitchen has a chili pepper decorating theme, you might want to use that to insire your tray design. You can be as whimsical as you want, too. For example, cover a tea tray in an assortment of “T”s in all shapes and sizes.
- Prepare your images by fixing them (if necessary) and cutting them out.
- Prepare your tray by sanding or painting it as described above. Lay the imageson the tray and arrange them as desired.
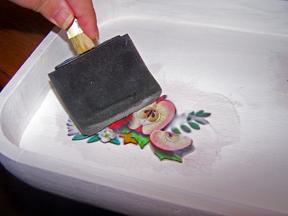
- Brush some medium on the back of your image using a small craft paint brush or sponge applicator brush, then lay it flat on your image. Smooth it out gently with a brayer or a plastic scraper, starting with the center and working your way out to the edges. This will help release wrinkles, air bubbles, or thick globs of the medium.
- Brush on another coating of decoupage medium right over the image, going off the edges and onto the tray to ensure a good seal.
- Continue to add as many images as you desire. You can put them on sparsely, or overlap many to completely cover the original surface. It’s up to you.
- Once the initial coat dries, add another coat of medium to cover the entire project and create a protective seal.
- If it’s going to get a lot of wear and tear, like a tray for serving food or beverages would get, you can finish the job by brushing on a couple of coats of clear waterproof polyurethane sealer.
Decorating With Decoupage
Fast & Easy Rice Paper Decoupage
What Else can You Decoupage?
- Once you’ve gotten the basic technique down, the possibilities are pretty much endless. Decoupage table surfaces. If you have a shabby looking end table or nightstand, decoupage the surface to make it more attractive. Perhaps you can decoupage your child’s furniture with his favorite storybook characters. Decoupage your kitchen breakfast nook with fruits and vegetables for a garden theme.
- Tables aren’t the only furniture you can decoupage. Embellish your dining room chairs with your initials in gold letters. Paint a dresser in high gloss paint then decoupage Asian symbols on the front drawers to look like lacquer inlays. Decoupage cabinet doors on an armoire, or in your kitchen and bathroom.
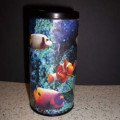
- You can accessorize with decoupage as well. Decoupage images onto a lamp— or a lamp shade. Get some glass pillar candles and decoupage images onto the glass; as the candle glows the light will shine right through the images for a pretty translucent effect. Decoupage the names of your kitchen spices on mason jars.
- Decoupage the cover of your scrapbook, your child’s school notebook or of your diary.Collect vases, jewelry boxes, cookie jars and other items from thrift shops and garage sales to decoupage. They make great gifts for the holiday.
- Decoupage your switch plates for your light switches and electric sockets. If you go to a home improvement store, you’ll find fancy, decorative switch plates can cost over $10. You can redesign your old ones for pennies in an afternoon craft session with decoupage.
- Collect sturdy boxes, such as hat boxes, shoe boxes or cigar boxes. Turn them into a work of art for pretty storage containers.
- You can even decoupage your house. Decoupage your family name on your mailbox or your house numbers on your front door. Instead of using wallpaper to paint a border around a room, or instead of stenciling an embellishment on a wall, decoupage images all around!
- For people who always felt they lacked the patience or the talent to create home crafts, decoupage offers instant gratification. The process is fun and easy, the supplies are cheap and the results can look professional. Once you get started, you may find yourself always on the look-out for your next project